Rust on an Embedded Device
Similar to other programming languages development for embedded devices in Rust differs from computers. In Rust, it is mainly the lack of standard library support. This section covers a few highlights from the development process.
Demo Application
To get familiar with Rust in a real-world embedded environment I chose to write a sensor fusion program, estimating the orientation from a gyroscope and an accelerometer. The platform in the figure is based on a NUCLEO-F446RE from ST featuring an ARM Cortex-M4F MCU and X-NUCLEO-IKS01A3 sensor shield from ST as well. The shield contains a 3D accelerometer plus gyroscope sensor (LSM6DSO), an additional 3D accelerometer (LIS2MDL), a 3D magnetometer (LIS2DW12), a pressure sensor (LPS22HH), a humidity and temperature sensor (HTS221) and another temperature sensor (STTS751).
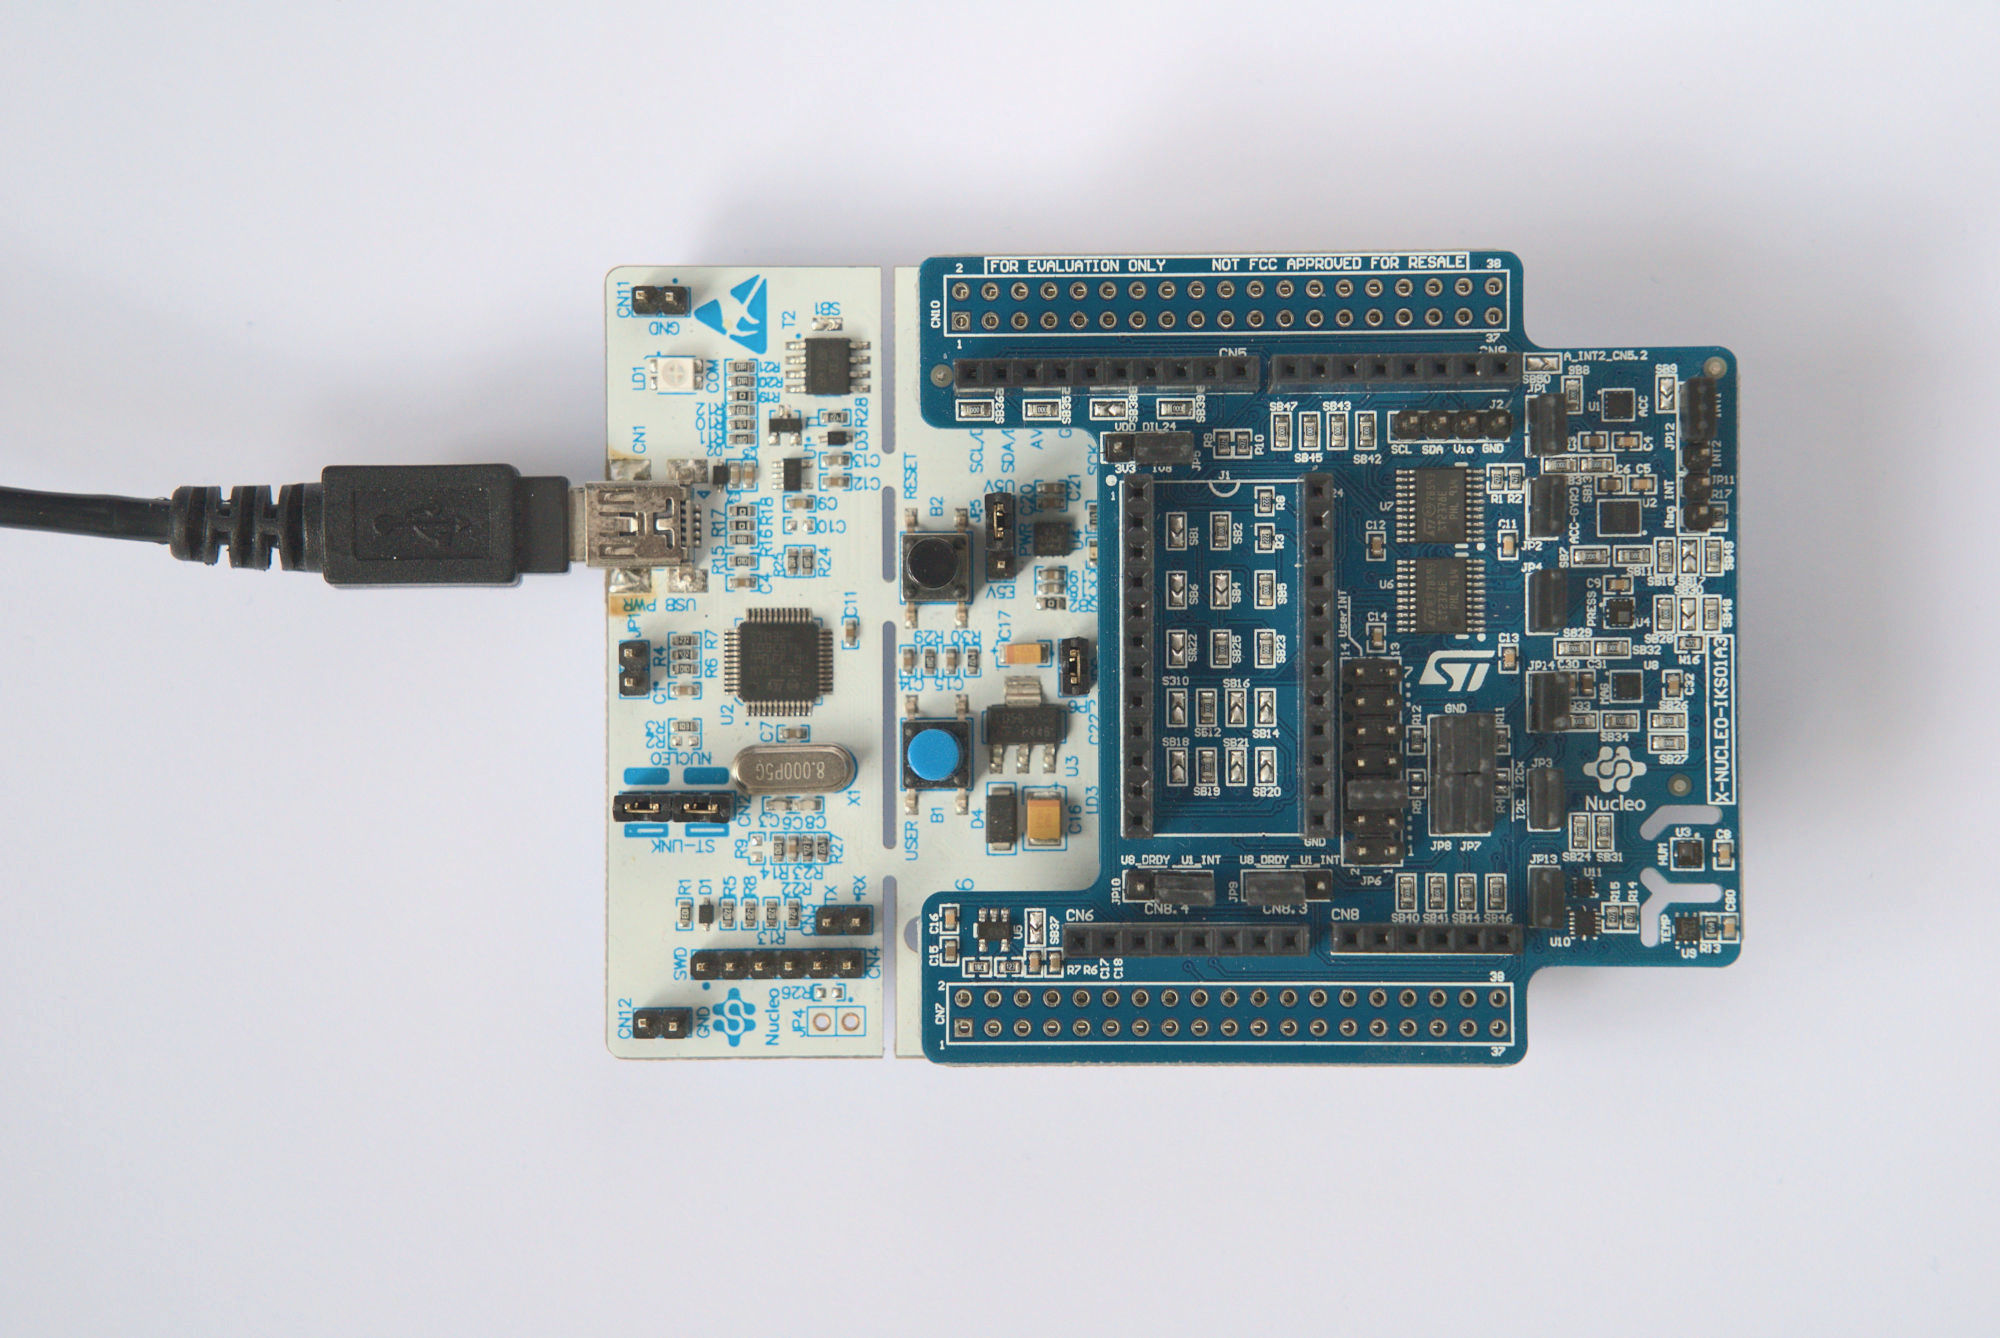
Figure: Embedded platform: MCU evaluation board (NUCLEO-F446RE) and sensor shield (X-NUCLEO-IKS01A3)
The demo application reads the current acceleration and angular velocity over an I²C bus. It then updates the estimate of the orientation using sensor fusion and prints the result to a serial output (UART) in JSON format. That covers the aspects of typical embedded application:
- Configuring internal peripheral, such as clocks, timers and GPIOs
- Accessing board peripherals through a bus (I²C, SPI)
- String formatting and serial communication (UART)
- Cross compilation and debugging set-up
- Modular and reusable software development
We also need to somehow check whether the orientation the embedded application outputs makes sense. For that purpose I wrote a Python script, that plots the current 3D orientation and the measurements from the accelerometer and gyroscope. The plots of an example run are shown in the figure.
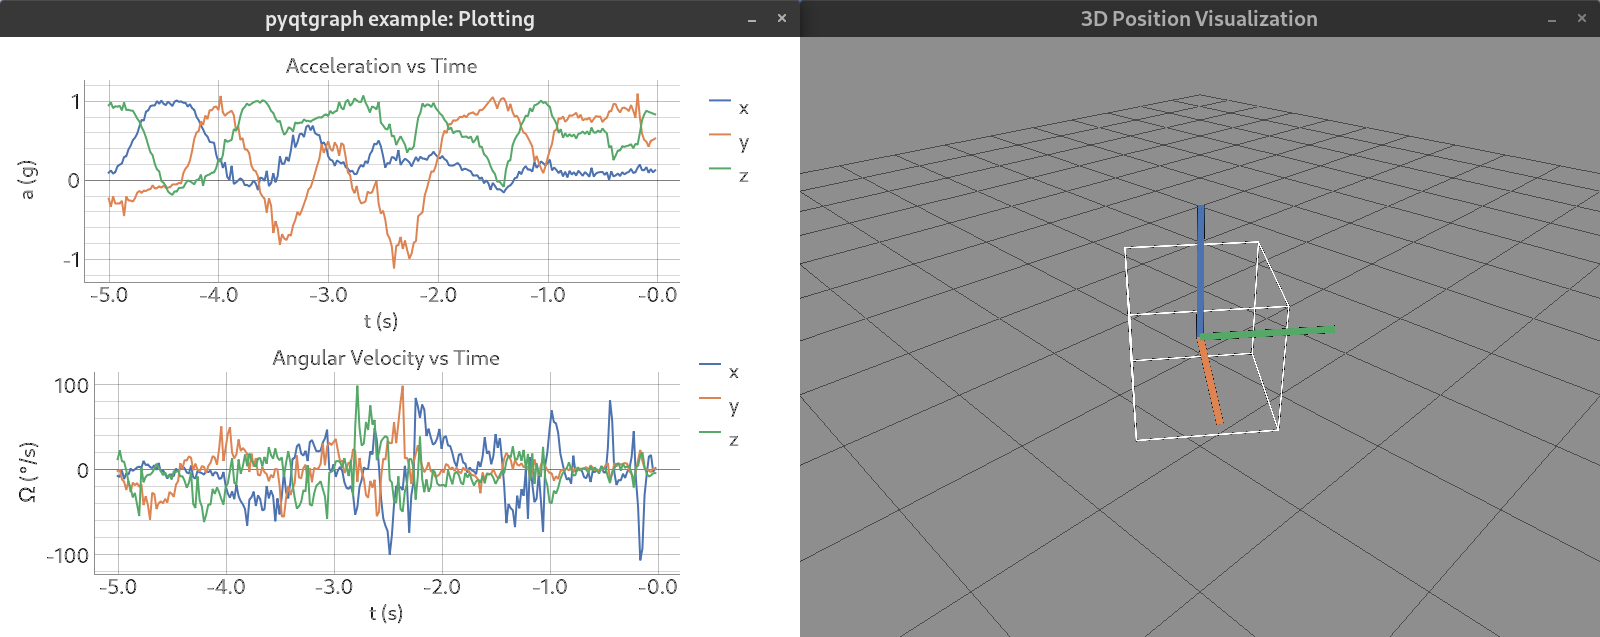
Figure: Orientation visualization with a Python script
The Rust source code for the embedded application is available at [6] and the Python script for the visualization at [5].
Embedded-HAL
All microcontroller manufacturers provide a hardware abstraction layer (HAL) library to access peripherals without dealing with memory mapped registers. The API for the HAL may vary depending on the manufacturer, though there is some conses that most are written in C and for ARM Cortex CPU core they are compliant with the CMSIS interface. In contrast, HALs in Rust are community driven. The API for a HAL is defined in the embedded-hal crate as traits. They are then implemented for the different microcontrollers, like the stm32f4xx-hal crate. This implies two things: [15]
-
The HAL is completely rewritten by the Rust community and might not be as complete as the manufacturers HAL.
-
Because all implementations use one common API, code is portable between all microcontroller manufacturers and architectures.
As the HAL development is community driven, it will in some cases not have all the features you need. Another drawback is that even the embedded-hal has not reached a stable release yet. The API of a HAL is thus subject to change. Nevertheless, a unified HAL API is compelling, writing platform agnostic device drivers was never easier.
The Rust community has implemented the HAL differently from a typical manufacturer HAL. We will now look at some differences.
// take MCU peripherals (can only be called once)
let stm32_peripherals = stm32::Peripherals::take()1 .unwrap();
// Set system clock to 48MHz
let rcc = stm32_peripherals.RCC.constrain();
let clocks = rcc.cfgr.sysclk(48.mhz()2 ).freeze();
// Set-up GPIOs
let gpiob = stm32_peripherals.GPIOB.split();
let sda = gpiob.pb9.into_alternate_af4_open_drain();3
let scl = gpiob.pb8.into_alternate_af4_open_drain();
// Configure I2C1 with a speed of 100kHz
let i2c = hal::i2c::I2c::i2c1(
stm32_peripherals.I2C1,
(scl, sda),
KiloHertz(100),2
clocks4
);
Listing: Configuring an I²C interface with the embedded-hal
At
Generics
There is no driver for any of the sensors on the sensor shield X-NUCLEO-IKS01A3 on crates.io. Thus, support for a few sensors was added based on the existing lis3dh crate. Because with the embedded-hal, every peripheral has its own type a driver that uses a peripheral must be generic.
lsm6dso/src/lib.rs
use embedded_hal::blocking::i2c::{Write, WriteRead};
pub struct Lsm6dso<I2C>1 {
i2c: I2C,2
address: u8,
}
impl<I2C, E>3 Lsm6dso<I2C>4
where
I2C: WriteRead + Write,5
{
/// Create a new LSM6DSO driver from the given I2C peripheral.
pub fn new(i2c: I2C6 , address: SlaveAddr) -> Result<Self, Error<E>> {
let mut lsm6dso = Lsm6dso {
i2c,
address: address.addr(),
};
/*...*/
}
/*...*/
}
Listing: Generalization of sensor driver by using generics
the listing contains a simplified extract of the LSM6DSO (accelerometer and gyroscope sensor) driver. First off, the data is defined in a struct (Lsm6dso). Similar to C++ template programming, <I2C> i2c in the data structure
The implementation of Lsm6dso again declares a generic type I2C is that we are missing the methods to write to the bus. The solution is to declare that the specific type for I2C must implement the WriteRead and Write traits from the embedded-hal I2C is inferred by the compiler by the new()
Peripheral Sharing
Most peripherals, such as GPIOs are only accessed by one software module, with clear ownership of the peripheral. Buses such as SPI or I²C are often accessed from multiple device drivers. But Rusts ownership allows only for one owner. This problem has already been solved by Rust community with the shared-bus crate.
let sensor_bus = shared_bus::BusManagerSimple::new(i2c1 );
let mut sensor_imu = Lsm6dso::new(sensor_bus.acquire_i2c(),2 SlaveAddr::Alternate).unwrap();
let mut sensor_temp = Stts751::new(sensor_bus.acquire_i2c()3 ).unwrap();
Listing: Sharing an I²C interface in Rust
the listing shows how to share one single I²C bus shared-bus crate contains a mutex to ensure access to the bus is thread/interrupt-safe.
Multitasking with the RTIC Framework
Real-Time Interrupt-driven Concurrency (RTIC) is a framework that uses interrupt handlers to offload context switches to the hardware. This is an implementation of the Real-Time for the masses (RTFM) [16] concept. The Rust implementation also features compile time guaranteed deadlock free execution and minimal scheduling overhead.
The RTIC framework heavily uses Rust attributes like #[rtic::app(...)] to generate code that handles concurrency. As an example, we will look at the adaptation of the demo application to RTIC.
#[rtic::app1 (device = stm32f4xx_hal::stm32, /*...*/]
const APP: () = {
struct Resources2 {
bus_devices: SharedBusResources<BusType>,
/*...*/
}
#[init3 (schedule = [sense_orientation])]
fn init(cx: init::Context) -> init::LateResources {
/* Initialize peripherals and objects ...*/
cx.schedule4 .sense_orientation(cx.start + DELAY_TICKS)).unwrap();
init::LateResources5 {
bus_devices: SharedBusResources { sensor_imu, sensor_temp },
/*...*/
}
}
#[task6 (resources = [bus_devices], schedule = [sense_orientation])]
fn sense_orientation(mut cx: sense_orientation::Context) {
let acceleration = cx.resources7 .bus_devices
.sensor_imu.accel_norm().unwrap();
/*...*/
cx.schedule.sense_orientation(cx.scheduled + DELAY_TICKS)
.unwrap();
}
/*...*/
extern "C" {
fn EXTI0();8
}
};
Listing: Reading a sensor value over I²C using RTIC
On the first line of the listing a tool attribute Resources struct
Code for initialization has its own attribute sense_orientation(). The task is scheduled explicitly at init() function we fill the resource struct defined at
The sense_orientation() function has the task attribute
sense_orientation is a software task as it is not triggered by any hardware interrupt. Still, with RTIC we need to assign a hardware interrupt for the scheduler